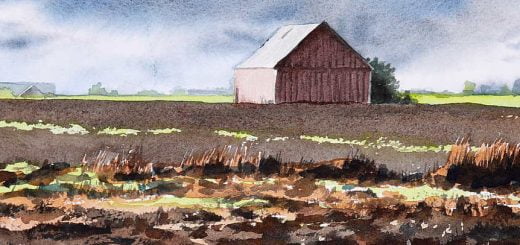
Drybrushed lake
March 13, 2024

This painting can be difficult or easy to paint, depending on your brush technique. Many less experienced watercolor painters usually have a far too strict attitude when it comes to how they use their brush. In this painting, it is important to relax a little, to be somewhat less precise and more spontaneous. If you were to be too precise, and even picky, the result might be heavy and overworked. This Painting is best painted quickly and easily.

You can use whatever colors you want, for this exercise I don’t have a particular palette. A brown, blue and cold red is a possible combination. My painting is approx. 20 cm (8 inches) wide, so quite small. If you want to make a larger image, that is of course fine, but larger also means technically more difficult.
Step 1

Start with the blue sky. The white clouds must be painted negatively, this means that you create the shape of them by painting the blue that is behind. It’s good to have a pencil drawing for the white clouds, but it’s impossible to follow it exactly.
The slightly textured edge around the clouds was created with a dry brush.
With fast painting and drybrushing, you will surely miss some lines and make some clouds too small while others will be too big, it cannot be avoided. Be happy with the result even if it’s not exactly how you want it.
Try to make the sky lighter the further down to the horizon you paint. You achieve this by starting at the top, and gradually diluting your blue color with more water.
Step 2

Now you are going to mix a dirty pink color, I just mixed a little brown into the cold red color. Dilute the mixture with a ridiculous amount of water, it should only hint at a red light on the clouds and is therefore mixed very light.
Paint a little quickly with dry brush technique pink on the clouds, but not all the way to the blue background, leave an unpainted edge around all the clouds.
Continue painting the pink color all the way down to the bottom edge of the paper. So the whole lake is painted pink.
Step 3

The dark clouds are to be painted now. Mix a fairly dark color of blue and brown. With my color choice the mixture will be greenish, in that case add some red color to make a blue black color. Before you start painting grab a piece of kitchen paper or similar, this is needed to make the sun rays, and roll the paper into a small ball.
Dry brush the edges of the clouds, paint the rest of the clouds as usual, that is, a little wet. Use the photo as a template but accept that it will be different. Paint down to the waterline, that is, over what will later become forest.

Before the dark paint has time to dry, some light rays of the sun should be absorbed with the paper ball that you created before you started painting the clouds. Imagine where the sun is behind the clouds, and create the rays by making quick strokes with the paper ball from this imaginary point, turn the ball after each stroke so you don’t use the same part of the paper more than once.
A little color from the clouds will, when you drag the ball of paper over the surface, stain the paper underneath, what will later become the lake, don’t worry about this, that part will be dark and it doesn’t matter if it gets a little dirty.
Step 4

It’s time to paint the lake now. If you have some of the dark cloud color left, use it, but change it slightly so it’s not exactly the same as the color of the clouds, I made it a little bluer.
Paint with quick horizontal brushstrokes in such a way that dry brush effects occur here and there. The brush strokes should be as horizontal as possible. Try to roughly imitate where it is light and dark in the photo, that is, where you should paint and where you should leave the paper unpainted. A quick painting will probably be better than a careful one.
Step 5

Paint the forest on the distant shores. For this, you must mix a very dark color. Then take some of this dark color and put it in a new mixing cup, add some water to make it a little lighter.
Start painting the furthest woods with the lighter of the two colors. When this is done and allowed to dry, the two dark, closer shores should be painted with the darkest color.
A tip for painting spruce forests from a distance is to first paint the entire forest but leave out the tops. Before the paint has had time to dry, the tops are then painted with a small brush by “stamping” them there. In this way, you get a rather believable silhouette of a spruce forest and it is quite quick to do.