Red onion – a watercolor exercise


This is primarily an exercise in color mixing. Two colors are used for the painting. It is difficult to use colors other than those suggested, which are Quinacridone rose and phthalo green yellow tone.
I have also used a yellow color, but it is used very sparingly. You can choose the yellow color yourself. It will also work with yellow-brown colors such as unburnt sienna or yellow ochre.
There are several colors similar to the red color, Alizarin crimson, quinacridone violet to name a few. Perhaps you have an alternative color that works.
The green color is more difficult to swap with another, one requirement is that the two colors must be able to mix black with, when they are mixed correctly. So if you lack phthalo green, feel free to try something else, but first mix with the red color to see if it is possible to make black with them.
Other supplies you need for this painting: Masking fluid and dip pen. If you lack any of these, the exercise will be too difficult to complete, in that case choose another exercise.
Step 1

The fine root threads are masked, use masking fluid for this. Since they are thin I used a dip pen, if you don’t have one you can try a small brush, but it’s hard to make really thin lines without a dip pen. (Read more about using a dip pen with masking fluid.)
When the masking has dried, the background must be painted. For this, a reasonably neutral color must be created from red and green. Make the color mixture quite dark, use this dark color as a starting point for different parts of the background, ie: take from the black mixture and dilute in new mixing cup as needed.
Start painting what’s behind the onion above the base. Start on the left side and gradually dilute the color so that it becomes lighter on the right side. This surface must be painted with a lot of paint, so the transition is smooth and nice without stains.
Turn the paper so that you can easily paint around the onion’s dry peel. Try to get all, or at least most, small peel strips and chips on the onion. When painting small details, it is especially important to use a lot of liquid, otherwise you risk the surface becoming dry when you paint small things, which can result in spots and blooms.
Let the background dry before painting the underlay that the onion is on. The substrate is first painted with a really light neutral color, take from your black mixture and dilute it with a lot of water. Before the paint has dried, use very dark paint to create a shadow, below and to the right of the onion. This should be done wet on wet, so it is important that the original color is wet, so have your black paint ready before you start painting the light base color.
It’s easier to create a nice shadow if you don’t add too much liquid, so use a small brush to paint the shadow.
Step 2

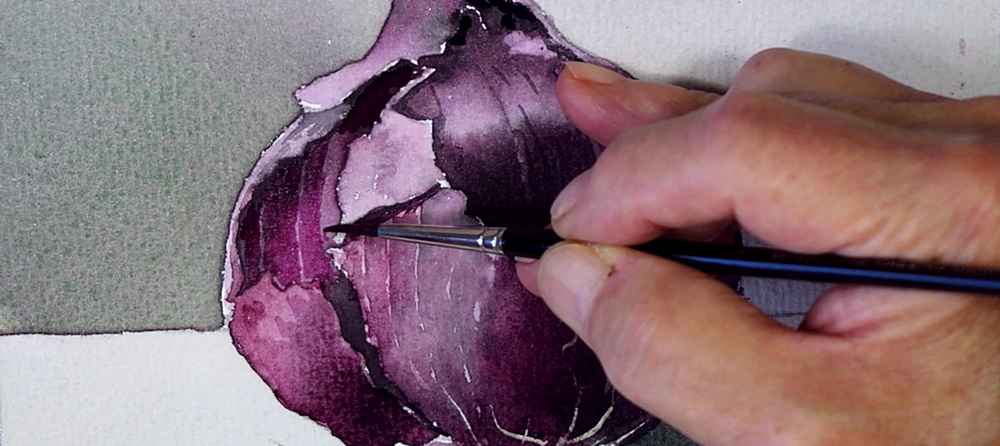
Mix a lighter red-violet color with red and green. Also mix an almost black color that has a faint hint of red. With these two colours, the inner, slightly shiny skin of the onion should be painted. Start with the light color, and add the dark before the light color has had time to dry. In this way, you get soft and fine transitions between light and dark parts of the onion peel.
Also use the black color at the edges of the shiny peel, then you get good shadows from the upper peel. You can also add some dark lines that follow the curve of the onion.
Step 3

When the color you painted in the previous step has dried, you should start with the outer, drier onion peel. It’s lighter than the inside of the onion you painted earlier, but otherwise the same color. Therefore, just dilute the leftover color from before to make it lighter, but keep the dark color unchanged. It is needed for the dark parts of the dry shell.
To create the dry and brittle feeling in the onion peel, savings are important. Therefore, do not paint all the way to the edge of the inner shell, but leave a narrow strip unpainted, or at least painted with a lighter color. These small savings appear a little uneven here and there, try to follow the photo. The contrasts are important, try to make a very big difference between the darkest parts (which are almost black), and the lightest (which are very light).
Step 4

Root threads are painted as a finish. Rub off the masking fluid with your fingers. The now white roots are first painted with a light yellow-brown “root color”, which is mixed with your yellow color plus a little of the red-violet color you used for the shell. Of course, it will not be right at the first mix, balance the mix so that a believable color is created.
Then paint all the root threads with the paint, they are narrow and it is easy to miss a bit and get yellow color on the red onion too, it doesn’t matter. It will not be noticeable once the paint has dried.
Let the yellow color dry and then paint shadows on the roots with a blackish color mixture. I used a dip pen for this, they are thin. It’s hard to paint such thin things with a brush.


